Overview
New Project Wizard
Export Wizard
Settings
Purchase and Support
Export Wizard
To export the extracted data, you should click the Export button  on the toolbar or select Results -> Export
on the menu. This will launch the Export Wizard. You can also automatically export the extracted data using the last used export configuration in the project
by clicking the Quick Export button
on the toolbar or select Results -> Export
on the menu. This will launch the Export Wizard. You can also automatically export the extracted data using the last used export configuration in the project
by clicking the Quick Export button  or by selecting the Results -> Quick Export menu item.
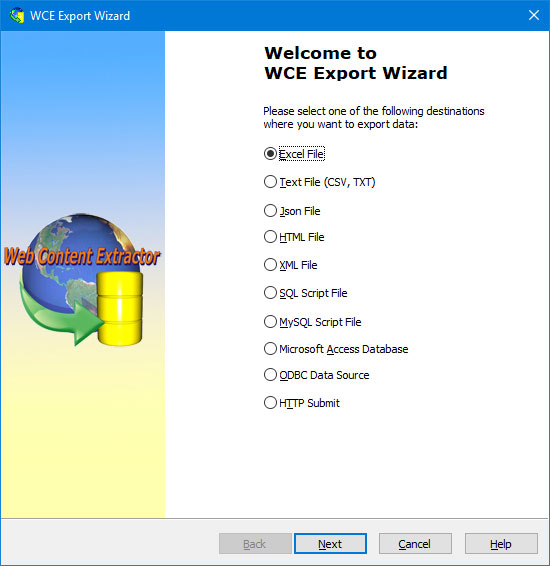
In the first step of the export wizard, you should select the format of the file you want to export the data.
In the second step of the export wizard, you should choose the data fields you want to export. You can choose the fields using the buttons to the right from the list. To select all existing fields, click the "Reset To Defaults" button. To save the current settings to a file, click "Save". To load previously saved settings from a file, click "Open". Below you can see the list of available parameters depending on the file format:
| File format | Parameters | Wizard Screenshot |
| Excel File | "Add Field Header" - the option determining whether fields have headers. |  |
| Text File (CSV, TXT) |
"Field Delimiter" - the character used to separate fields. "Text Qualifier" - the character used to mark the start and end of a field. "Add Field Header" - the option determining whether fields have headers. |
 |
| Json File | "Json Code Template" - the Json file template that can contain variables with the name coinciding with the name of a data field and enclosed in the % characters. For example, if you have a field named "Category", the name of the variable for this field will also be "%Category%". The program will replace the variables with the values of the corresponding data field. To define a loop for every row of results, you should use two marks "<!-- DataRowBegin -->" and "<!-- DataRowEnd -->". The entire code between these marks will be repeated for every row of results. |  |
| HTML File | "HTML Code Template" - the HTML file template that can contain variables with the name coinciding with the name of a data field and enclosed in the % characters. For example, if you have a field named "Category", the name of the variable for this field will also be "%Category%". The program will replace the variables with the values of the corresponding data field. To define a loop for every row of results, you should use two marks "<!-- DataRowBegin -->" and "<!-- DataRowEnd -->". The entire code between these marks will be repeated for every row of results. |  |
| XML File | "XML Code Template" - the XML file template that can contain variables with the name coinciding with the name of a data field and enclosed in the % characters. For example, if you have a field named "Category", the name of the variable for this field will also be "%Category%". The program will replace the variables with the values of the corresponding data field. To define a loop for every row of results, you should use two marks "<!-- DataRowBegin -->" and "<!-- DataRowEnd -->". The entire code between these marks will be repeated for every row of results. |  |
| Microsoft Access Database | "Table Name" - the name of a new or existing table in the database. |  |
| SQL Script File (text file containing SQL statements) |
"Table Name" - the name of a new or existing table in the database. "Enclose field names in" - the character used to mark the start and end of a field name. |
 |
| MySQL Script File (text file containing mySQL statements) |
"mySQL Script Type" - if you select this type, the Export Wizard will create a text file containing mySQL statements that can be executed from the SQL client. "PHP/mySQL Script Type" - if you select this type, the Export Wizard will create a text file containing a PHP script that connects to the mySQL database and executes mySQL statements. "Database Name" - database name. "HostName" - MySQL server address. "UserName" - username. "Password" - password. "Table Name" - the name of a new or existing table in the database. |
 |
| HTTP Submit |
"Action URL" - the URL to send the extracted data to "HTTP Method" - the method how to send the form "UserName" - username. "Password" - password. "Convert UTF-8 encoding to ANSI encoding" - if you enable this option, the program will convert characters in the UTF-8 encoding into characters in the specified encoding. |
 |
| ODBC Data Source |
"Data Source Name" - a name registered with ODBC through the ODBC Administrator program. "UserName" - username. "Password" - password. "Table Name" - the name of a new or existing table in the database. "Convert UTF-8 encoding to ANSI encoding" - if you enable this option, the program will convert characters in the UTF-8 encoding into characters in the specified encoding. "Enclose field names in" - the character used to mark the start and end of a field name. "If the table already exists, drop it" "If the table already exists, append to the end of it" "Start export from the last exported record " - if this option is enabled, the program will export only newly extracted data. For example, you've exported records from 1 to 100 with the first export. The program will start the next export with record 101. |
 |
In the last step of the export wizard, you should specify a name of the output file and you can change the following parameters:
- "If the file already exists, overwrite it"
- "If the file already exists, append to the end of it"
- "Maximum records per file"
- "Export each record into a new file"
- "Open file after export" - if this option is enabled, the program will open the output file after the data is exported to it.
- "Add date/time stamp to the file name" - this option appends the date and time to the output file name in the following format: mmdd-hhmm.
- "Convert UTF-8 encoding to ANSI encoding" - if this option is enabled, the program will convert characters in the UTF-8 encoding into characters in the specified encoding.
- "Maximum length of a field's value (characters)" - if this option is enabled, the program will limit the text length in each field to the specified number of characters.
- "Start export from the last exported record " - if this option is enabled, the program will export only newly extracted data. For example, you've exported records from 1 to 100 with the first export. The program will start the next export with record 101.
- "Upload output file to FTP server" - if this option is enabled, the program will upload the output file to a FTP server after exporting.
- "Upload images to FTP directory" - if this option is enabled, the program will upload the extracted images to a FTP server into the specified directory after exporting.
- "Open remote file after uploading. File URL" - if this option is enabled, the program will open the uploaded file in your browser.
FTP Settings
- "Server Address[:Port]" - This field lets you enter the server host or IP-address of the FTP server, e.g. ftp.microsoft.com. A different port number can be specified separated by a colon, e.g. ftp.domain.com:1021
- "User Name" - Here you can enter the user name (anonymous if you don't have an account on the server).
- "Password" - Here you can enter the password for the FTP server.
- "Directory" - If you specify a directory here, the program will try to change this directory on the remote host immediately after connecting.
- "Image Directory" - The remote directory to upload the images.